Back in the days when the stereo Realist format ruled the 3D world (it was not that long ago), slide mounting for stereo projection was considered the norm. Even if you never intended to show your slides on a big silver screen, you kinda took the pictures (with your clunky old stereo camera) and mounted the slides with the stereo projection principles in mind.
When mounting stereo slides for stereo projection, you had the choice between three types of mask. The windows/apertures in each type of mask have the same center but the size of the windows are different (thus changing the position of the stereo window).
Here are the three types of mask available:
- DISTANT MOUNTS: Cover subject matters from 7 feet to infinity.
- MEDIUM MOUNTS: From 4 to 20 feet.
- CLOSE-UP MOUNTS: From 2.5 to 6 feet.
The main reason to have those masks is that there is no need for projector adjustment when projecting a series of slides because the centers never change (to be honest, I don't fully understand this but it's not really the point here). The other reason (and that's the one we're interested in) is that, when projected, the distances between corresponding points (on the left and right images) are always from 0 to 2.5 inches apart, which guarantees comfortable viewing for the audience. Those masks basically limit the depth, the distance between the foreground and the background in your pictures. In general, when a stereo pair is projected onto a screen, you don't want to have points separated by more than 2.5 inches (the distance between our eyes) because, otherwise, it forces our eyes to diverge (this is referred to as divergence and you really don't want it). If you consider the distant mounts, the points at 7 feet are positioned at the stereo window (the silver screen) and the points at infinity are 2.5 inches apart, which is perfect for comfortable viewing. Same idea for the medium and close-up mounts. Remember that convergence is usually never a problem for our eyes but divergence always is.
These principles are in my opinion still valid today with 3D digital cameras like the Fuji Finepix 3D W3 camera. For example, I don't think it's a very good idea to take a picture with very near objects and distant ones as the convergence range is likely to be too large.
Of course, rules are always meant to be broken.
Sunday, June 26, 2011
Saturday, June 25, 2011
Stereo Matching - Depth Maps from Stereo Pairs
3D lenticulars made from just the left and right images suffer from a very narrow viewing angle, which makes getting the 3D effect difficult. Intermediate frames makes the viewing a much more pleasant experience. They also make the GIF animations (wiggles) more fluid and therefore more effective. Understandably, there's a lot of interest in generating depth maps from stereo pairs in the 3D community.
If you have a look at the academic papers that deal with depth maps or stereo matching (just using google), you will soon be overwhelmed by the amount of stuff that's being written over the years. The question is: how do you know which method works best?
There's a paper published in 2002 titled "A Taxonomy and Evaluation of Dense Two-Frame Stereo Correspondence Algorithms" by Daniel Scharstein and Richard Szeliski that does a thorough review of stereo matching methods. "Taxonomy" means that they have identified "building blocks" that are common in most algorithms. Doing that always makes things easier since it shows that a lot of algorithms are actually quite similar in the way they are designed. "Dense" means that the matching is done at the pixel level. "Dense Two-Frame Stereo Correspondence" is basically another way of saying "depth map". The authors are kind enough to provide the source code that was used to do the testing (which you can use on your own stereo pairs). If you are interested in trying this out yourself, go to vision.middlebury.com, download the source code, the scripts and the images. You need to compile the code to be able to use the program, called StereoMatcher, which runs on a script that you can customize. On a windows pc, you're probably gonna need Microsoft Visual Studio (the Express version is free). On a linux box, it's a bit easier since the gnu C++ compiler is already there as part of the install. Once you have created the executable and read the scripts that are used to run the provided test cases, it's not that hard to figure out how you can run your own stuff. The only thing is that you're gonna have to save or convert your stereo images in the ppm format (see gimp or photoshop for that). You also have to be well aware that the stereo pairs you can feed to those stereo matching algorithms need to be rectified, that is, for any point in the scene, the two projected points (on the left and right images) must be on the same line, or scan line (see Stereo Matching Rectified Geometry).
I took the liberty to run StereoMatch on the (overused) test image called "Tsukuba":
Left image.
Right image.
True disparities.
Here are the depth maps for each available algorithm:
SSD (Sum of Squared Differences).
SO (Scanline Optimization).
SAD (Sum of Absolute Differences).
SA (Simulated Annealing).
GC (Graph Cut).

DP (Dynamic Programming).
GC (Graph Cut) appears to be the best performing algorithm for this particular benchmark stereo pair which, to be honest, has about nothing to do with the "real world" (piecewise planar objects perpendicular to the optical axes are not too commonly found in nature). If this subject fascinates you, check Stereo Matching - Local Methods, Stereo Matching - Global Methods, and Stereo Matching - Variational Methods for more info on various stereo matching methodologies.
I, Ugo Capeto, have implemented some software to generate depth maps from stereo pairs. It's available at the 3D Software page right here on this blog and it's free to download.
If you have a look at the academic papers that deal with depth maps or stereo matching (just using google), you will soon be overwhelmed by the amount of stuff that's being written over the years. The question is: how do you know which method works best?
There's a paper published in 2002 titled "A Taxonomy and Evaluation of Dense Two-Frame Stereo Correspondence Algorithms" by Daniel Scharstein and Richard Szeliski that does a thorough review of stereo matching methods. "Taxonomy" means that they have identified "building blocks" that are common in most algorithms. Doing that always makes things easier since it shows that a lot of algorithms are actually quite similar in the way they are designed. "Dense" means that the matching is done at the pixel level. "Dense Two-Frame Stereo Correspondence" is basically another way of saying "depth map". The authors are kind enough to provide the source code that was used to do the testing (which you can use on your own stereo pairs). If you are interested in trying this out yourself, go to vision.middlebury.com, download the source code, the scripts and the images. You need to compile the code to be able to use the program, called StereoMatcher, which runs on a script that you can customize. On a windows pc, you're probably gonna need Microsoft Visual Studio (the Express version is free). On a linux box, it's a bit easier since the gnu C++ compiler is already there as part of the install. Once you have created the executable and read the scripts that are used to run the provided test cases, it's not that hard to figure out how you can run your own stuff. The only thing is that you're gonna have to save or convert your stereo images in the ppm format (see gimp or photoshop for that). You also have to be well aware that the stereo pairs you can feed to those stereo matching algorithms need to be rectified, that is, for any point in the scene, the two projected points (on the left and right images) must be on the same line, or scan line (see Stereo Matching Rectified Geometry).
I took the liberty to run StereoMatch on the (overused) test image called "Tsukuba":
Left image.
Right image.
True disparities.
Here are the depth maps for each available algorithm:
SSD (Sum of Squared Differences).
SO (Scanline Optimization).
SAD (Sum of Absolute Differences).
SA (Simulated Annealing).
GC (Graph Cut).
DP (Dynamic Programming).
GC (Graph Cut) appears to be the best performing algorithm for this particular benchmark stereo pair which, to be honest, has about nothing to do with the "real world" (piecewise planar objects perpendicular to the optical axes are not too commonly found in nature). If this subject fascinates you, check Stereo Matching - Local Methods, Stereo Matching - Global Methods, and Stereo Matching - Variational Methods for more info on various stereo matching methodologies.
I, Ugo Capeto, have implemented some software to generate depth maps from stereo pairs. It's available at the 3D Software page right here on this blog and it's free to download.
Wednesday, June 22, 2011
Fujifilm Finepix Real 3D W3 - Focus
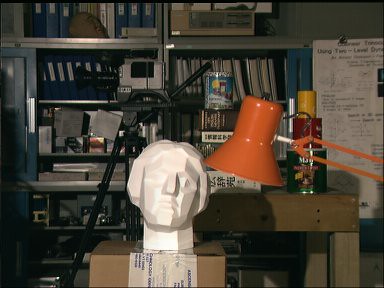
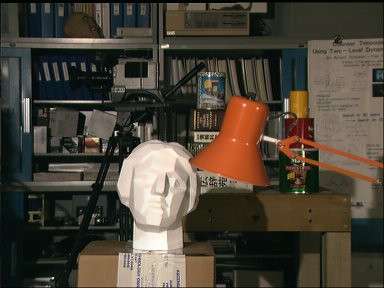
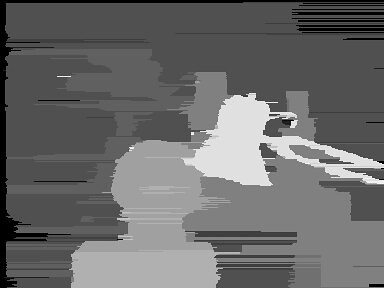
There seem to be some issues with focusing on the Fujifilm Finepix Real 3D W3 digital camera. It would seem logical to me that both lenses focus on the same thing but I don't think they do or, more exactly, it looks like they don't. It seems to me the right lens is correctly focused while the left lens is (usually) not. Have no idea whether it's mechanical or software related and whether it is supposed to be that way (under certain conditions maybe). It can clearly be seen at normal (100%) size when adjusting the stereo view in StereoPhoto Maker. Not saying that it's a big deal when you end up printing 6x4 prints but it's definitely annoying to see something out of focus when it's pretty clear that it shouldn't be. Below is a good example of what I am talking about:
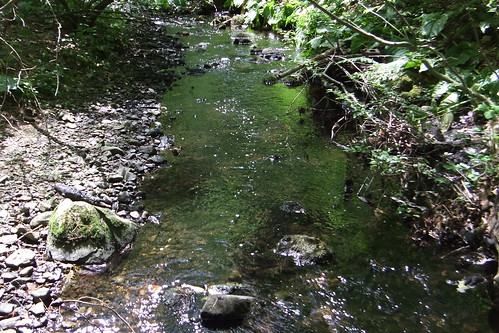
This is the left image of the pair. I remember vividly focusing on the large stone in the center of the foreground (confirmed when looking at the parallax in the foreground picture below). Not the greatest focusing point but the camera didn't complain when taking the picture so I can only assume it was good enough.
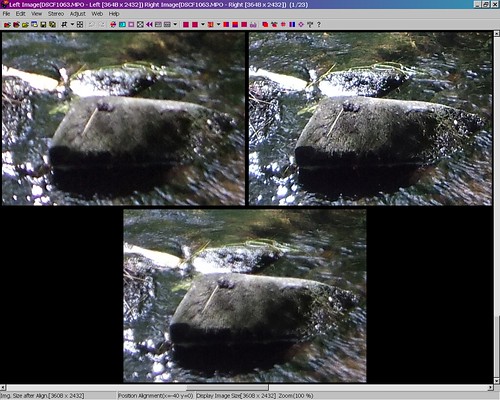
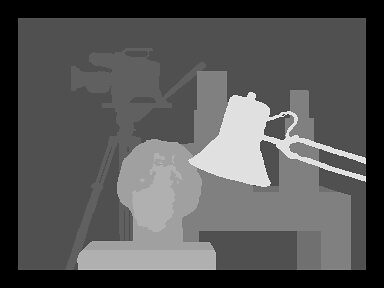
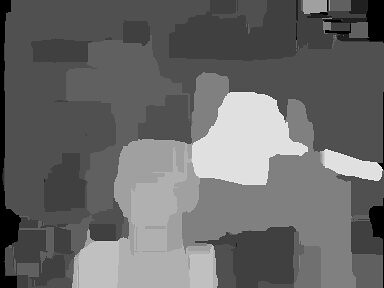
This is a close-up of the foreground in StereoPhoto Maker (I am using the stereo adjustment view at normal size). You can clearly see that the right picture is focused (expected, because that's where I actually focused the shot) while the left picture is blurry (not good).

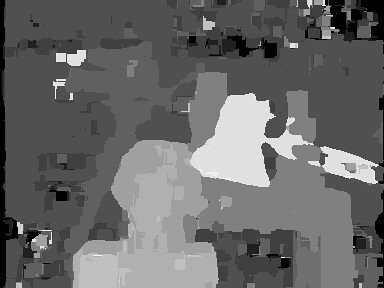
This is a close-up of the background. Now, the right picture is blurry (expected) while the left picture is more in focus.
I've chosen this picture because there's quite a bit of distance between the foreground and background and it really shows where the left lens is focusing (it's focusing on something much farther than the right lens). With other pictures, when there's not much distance in the shot between foreground and background, it kinda seems that the left lens is blurry all over (probably because it's focused on a point who knows where).
This seems kinda strange that the two lenses are not focusing on the same point but, for the sake of discussion, let's assume that the two lenses do indeed focus independently. Then, this whole thing could very well be an auto-focus problem when the object that's focused on is not super well defined against the background, especially in low light condition just like in the picture above (I've seen the same thing happen in bright light though). I have no problem with the auto-focus not being able to lock but then, why does the camera say it can focus (focus light is green and camera beeps) and, more importantly, why is the difference in focus distances between the two lenses so large? And this leads to another question: If the two lenses focus on possibly two different things, how can the camera's software figure out the parallax in auto mode? The problem is that you have no idea you're out of focus until you go into StereoPhoto Maker and check the parallax at normal size. If the camera can't focus, no problem, just let me know about it and I can take the appropriate action (hopefully).

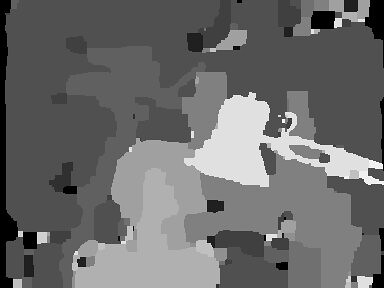
This is the wiggle (Piku-Piku) version from Start 3D (kinda like what StereoTracer from triaxes.com does). Obviously, if you only intend to show wiggles from your Fuji W3 mpo files, then being slightly out of focus on one lens may be the least of your worries.
Well, since then, I have taken a few more pictures in better light conditions and using better focus points, and it seems that the auto-focus behaves better. The two images are usually equally blurry under 100% magnification. Conclusion: the lenses on the Fuji w3 are not very good, to put it nicely.

This is the left image of the pair. I remember vividly focusing on the large stone in the center of the foreground (confirmed when looking at the parallax in the foreground picture below). Not the greatest focusing point but the camera didn't complain when taking the picture so I can only assume it was good enough.

This is a close-up of the foreground in StereoPhoto Maker (I am using the stereo adjustment view at normal size). You can clearly see that the right picture is focused (expected, because that's where I actually focused the shot) while the left picture is blurry (not good).
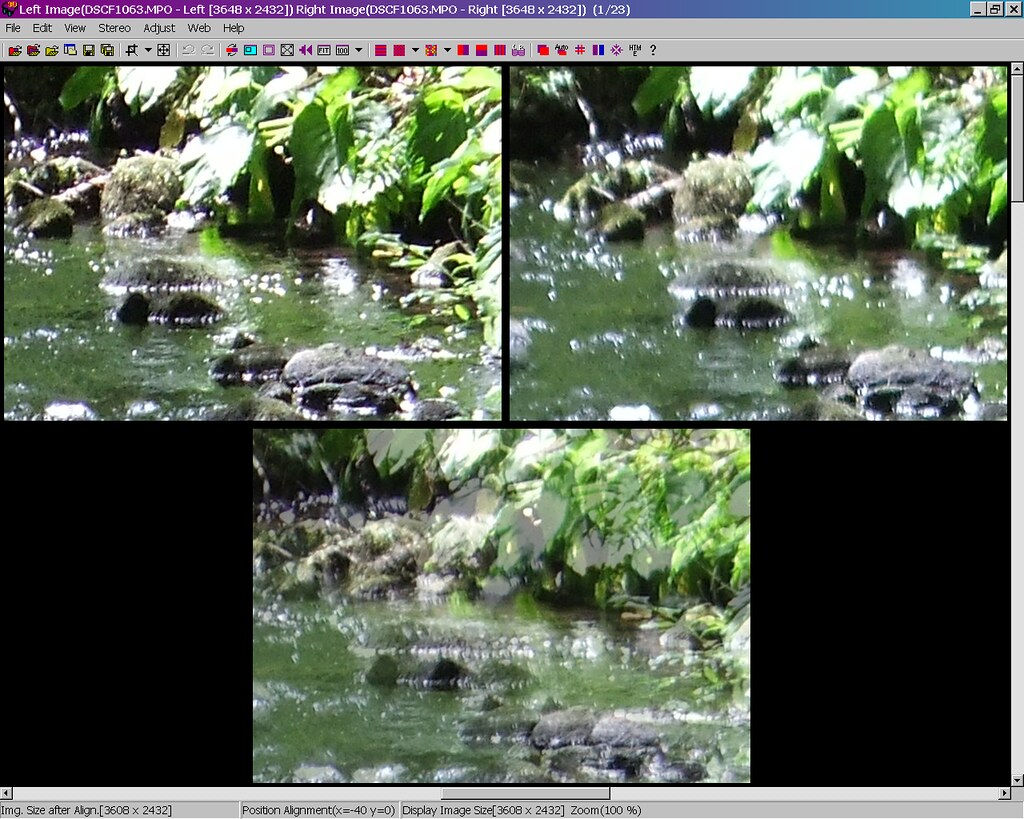
This is a close-up of the background. Now, the right picture is blurry (expected) while the left picture is more in focus.
I've chosen this picture because there's quite a bit of distance between the foreground and background and it really shows where the left lens is focusing (it's focusing on something much farther than the right lens). With other pictures, when there's not much distance in the shot between foreground and background, it kinda seems that the left lens is blurry all over (probably because it's focused on a point who knows where).
This seems kinda strange that the two lenses are not focusing on the same point but, for the sake of discussion, let's assume that the two lenses do indeed focus independently. Then, this whole thing could very well be an auto-focus problem when the object that's focused on is not super well defined against the background, especially in low light condition just like in the picture above (I've seen the same thing happen in bright light though). I have no problem with the auto-focus not being able to lock but then, why does the camera say it can focus (focus light is green and camera beeps) and, more importantly, why is the difference in focus distances between the two lenses so large? And this leads to another question: If the two lenses focus on possibly two different things, how can the camera's software figure out the parallax in auto mode? The problem is that you have no idea you're out of focus until you go into StereoPhoto Maker and check the parallax at normal size. If the camera can't focus, no problem, just let me know about it and I can take the appropriate action (hopefully).
This is the wiggle (Piku-Piku) version from Start 3D (kinda like what StereoTracer from triaxes.com does). Obviously, if you only intend to show wiggles from your Fuji W3 mpo files, then being slightly out of focus on one lens may be the least of your worries.
Well, since then, I have taken a few more pictures in better light conditions and using better focus points, and it seems that the auto-focus behaves better. The two images are usually equally blurry under 100% magnification. Conclusion: the lenses on the Fuji w3 are not very good, to put it nicely.
Subscribe to:
Posts (Atom)