I recommend using my stereo tools directly but I understand the convenience StereoPhoto Maker might offer, which is why I wrote this post. The issue I have with StereoPhoto Maker is the rectifier which not only aligns the stereo pair but also can provide the min and max disparities needed by the automatic depth map generator. I have no control over that part in StereoPhoto Maker and that bothers me a little bit. Just be aware that, to get good depth maps, it is quite important to have a properly rectified stereo pair and correct min and max disparities.
Be extremely careful about accepting the min and max disparity values (aka the background and foreground values) that StereoPhoto Maker can automatically provide! I strongly recommend you do that part manually. If the values differ a lot (the ones found automatically and the ones found manually), I would be quite suspicious about the proper rectification/alignment of the stereo pair. In that case, I would suggest using ER9b or ER9c to rectify, or if you are really keen on using StereoPhoto Maker, checking the "Better Precision (slow)" box under "Edit->Preferences->Adjustment" to get better rectification. Also, be extremely careful about StereoPhoto Maker resizing your stereo pair because of what's in "maximum image width"! I would not let StereoPhoto Maker resize the stereo pair and instead make sure that the stereo pair you are processing is under what's in "maximum image width".
Alrighty then, let's get back to the business hand, that is, generating depth maps with StereoPhoto Maker. I am assuming that you have installed StereoPhoto Maker and the combo DMAG5/DMAG9b on your computer. If you haven't done so yet, follow the instructions in How to make Facebook 3D Photo from Stereo pair. I am assuming you have downloaded and extracted the DMAG5/DMAG9b stuff in a directory called dmag5_9. That directory should look like so:
Because alignment of the stereo pair is of prime importance in depth map generation, I recommend going into "Edit->Preferences->Adjustment" and checking the box that says "Better Precision (slow)". As I don't particularly like large images, the first thing I do after loading the stereo pair is to resize the images to something smaller. In this guide, the stereo pair is an mpo coming from a Fuji W3 camera. The initial dimensions are 3441x2016. You could generate the depth maps using those dimensions but everything is gonna take longer. Clicking on "Edit->Resize", I change the width to 1200. I guess I could have resized to something larger but I wouldn't resize to anything larger than 3000 pixels. Once the stereo pair has been resized, I click on "Adjust->Auto-alignment" to align/rectify the images. As an alternative to SPM's alignment tool, you can use my rectification tools: Epipolar Rectification 9b (ER9b) or Epipolar Rectification 9c (ER9c).
To generate the depth map, I click on "Edit->Depth Map->Create depth map from stereo pair" where I am presented with this window:
What I recommend doing is getting the background and foreground disparity values manually first. To get the background value, use the arrow keys so that the two red/cyan views come into focus (merge) for a background point. Same idea for the foreground value. I keep track of those two values and then click on "Get Values (automatic)". If the automatic values make sense when compared to the ones obtained manually, I just leave them be. If they don't, I edit them and put back the values obtained manually. Since my image width is less than 3000 pixels, I don't bother with the "maximum image width" box. I don't like the idea of SPM resizing the images automatically so I always make sure that my image width is less than what it's in the "maximum image width" box. The reason I don't like the idea of SPM resizing my images is because, if you change the image dimensions, you are supposed to also change the min and max disparity, and I am not sure SPM does it. So, beware! As an alternative to having SPM compute the min and max disparities, you can use my rectification tools: Epipolar Rectification 9b (ER9b) or Epipolar Rectification 9c (ER9c). They both give you the min and max disparities in their output. I only want the left depth map so I keep the "Create left/right depth maps" unchecked. Since I want white to be for the foreground and black for the background (I always use white for the foreground in my depth maps), I click on "Create depth map (front: white, back: black)". Note that because I clicked on "Create depth map (front: white, back: black)", when it is time to save the depth map by going into "Edit->Depth map->Save as Facebook 3d photo (2d photo+depth)", I will need to click on "white" for the "Displayed depth map front side->white" so that the depth map does not get inverted when saved by SPM. If you don't mind a depth map where the foreground is black, then leave the "Create depth map (front: white, back: black)" radio button alone and don't click on it.
I recommend using the default parameters in DMAG5 (on the left) and DMAG9b (on the right) to get the first depth map (as you may need to tweak the parameters to get the best possible depth map). To be sure I have the default settings (SPM stores the latest used settings), I click on "Default settings". To get the depth map, I click on "Create depth map". This is the result:
To get the left image on the left and the depth map on the right, click on the "Side-by-side" icon in the taskbar. For more info on DMAG5, check Depth Map Automatic Generator 5 (DMAG5). For more info on DMAG9b, check Depth Map Automatic Generator 9b (DMAG9b) and/or have a look at dmag9b_manual.pdf in the dmag5_9 directory.
Now, if you go into the dmag5_9 directory, you will find some very interesting intermediate images:
- 000_l.tif. That's the left image as used by DMAG5.
- 000_r.tif. That's the right image as used by DMAG5.
- con_map.tiff. That's the confidence map computed by DMAG9b. White means high confidence, black means low confidence. If you clicked on "Create left/right depth maps", the confidence map gets overwritten when DMAG9b is called to optimize the right depth map.
- dps_l.tif. That's the left depth map produced by DMAG5.
- dps_r.tif. That's the right depth map produced by DMAG5. Even if the "Create left/right depth maps" box is unchecked, the right depth map is always generated by DMAG5 in order to detect left/right inconsistencies in the left depth map.
- out.tif. That's the depth map produced by DMAG9b. DMAG9b uses the depth map generated by DMAG5 as input and improves it. If you clicked on "Create left/right depth maps", there should be out.tif (left depth map) and out_r.tif (right depth map).
The depth map "out.tif" is basically the same as the depth map that you get by clicking on "Edit->Depth map->Save as Facebook 3D photo (image+depth)".
It should be noted that once you have created a depth map, you cannot re-click on "Edit->Depth map->Create depth map from stereo pair", possibly change parameters, and create another depth map. If you do that, the new depth map is basically going to be garbage because the right image has been replaced by the previously created depth map (take a look at 000_r.tif in the dmag5_9 directory to convince yourself). To re-generate the depth map, you need to undo or reload the stereo pair.
At this point, you may want to play with the DMAG5/DMAG9b parameters to see if you can improve the depth map. I think it's a good idea but be aware there may be areas in your image where the depth map cannot be improved upon. For instance, if you have an area that has no texture (think of a blue sky or a white wall) or an area that has a repeated texture, it is quite likely the depth map is gonna be wrong no matter what you do. So, improving the depth map is not always easy as, usually, some areas will get better while others will get worse. Some parameters like DMAG5 radius or DMAG9b sample rate spatial depend on the image dimensions and should kind of be tailored to the image width. I think it's best to change one parameter at a time and see the effect it has on the depth map. If things get better, keep changing that parameter (in the same direction) until things get worse. Then, you tweak the next parameter. Of course, it is up to you whether or not you want to spend the time tinkering with parameters. If you always shoot with the same camera setup, this tinkering may only need to be done once.
Let's see which parameters used by DMAG5 and DMAG9b are worth tinkering with in the quest for a better depth map. I believe changing the sample rate spatial used by DMAG9b from the default 32 to 16 or even 8 should be the first thing to change when trying to improve the depth map. I think the default 32 is probably too large especially if the image width is not that large (like here for our test case).
What DMAG5 parameters (on the left side of the window) give you the most bang for your bucks when trying to improve the mesh quality?
- radius. The larger the radius, the smoother the depth map generated by DMAG5 is going to be but the less accurate. As the radius goes down, more noise gets introduced into the depth map.
- downsampling factor. The larger the downsampling factor, the faster DMAG5 will run but the less accurate. Running DMAG5 using a downsampling factor of 2 is four times faster than running DMAG5 using a downsampling factor of 1 (no downsampling).
Note that those observations concern DMAG5 only. So, you should look at the dps_l.tif file to see the effects of changing DMAG5 parameters. Also, you may find that sometimes the depth map generated by DMAG5 is actually better than the one generated by the combo DMAG5/DMAG9b. Note that DMAG9b can be so aggressive that variations in the depth map produced by DMAG5 do not matter much.
What happens to the left depth map generated by DMAG5 if you change the radius from 16 to 8 (every other parameter set to default)? Let's find out!
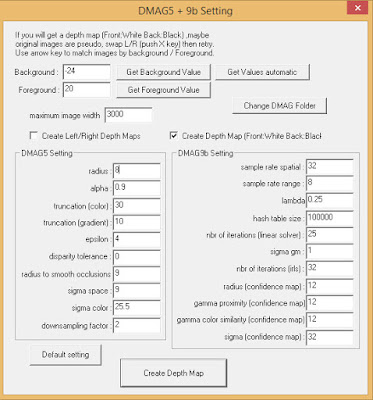
"Create depth map from stereo pair" window. Changed DMAG5 radius from 16 to 8 (every other parameter set to default).

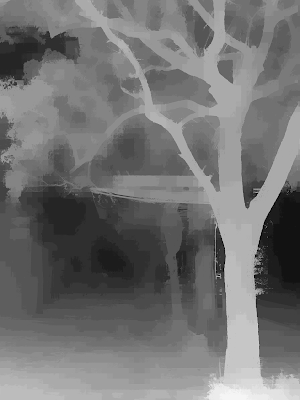
Left depth map generated by DMAG5 (dps_l.tif). Changed DMAG5 radius from 16 to 8 (every other parameter set to default).
What happens to the left depth map generated by DMAG5 if you change the downsampling factor from 2 to 1 (every other parameter set to default)? Let's find out!
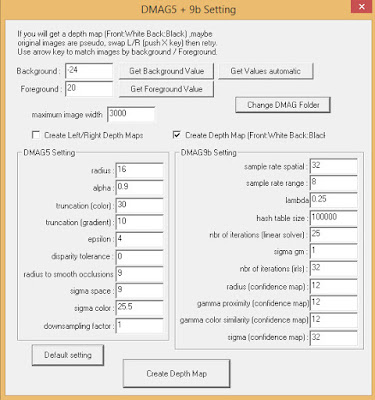
"Create depth map from stereo pair" window. Changed DMAG5 downsampling factor from 2 to 1 (every other parameter set to default).

Left depth map generated by DMAG5 (dps_l.tif). Changed DMAG5 downsampling factor from 2 to 1 (every other parameter set to default).
What DMAG9b parameters (on the right side of the window) give you the most bang for your bucks when trying to improve the mesh quality?
- sample rate spatial. The larger the sample rate spatial, the more aggressive DMAG9b will be. I recommend going from 32 (default value) to 16, 8, and even 4. If you can clearly see "blocks" in your depth map, the sample rate spatial is probably too large and should be reduced (by a factor of 2).
- sample rate range. The larger the sample rate range, the more aggressive DMAG9b will be. The default value is 8 but you can try 4 or 16 and see if it's any better.
- lambda. The larger the lambda, the smoother the depth map is going to be (in other words, the more aggressive DMAG9b will be). The default value is 0.25 but you can certainly try larger or smaller values. If you don't want the output depth map to be too different from the depth map generated by DMAG5 (dps_l.tiff), use smaller values for lambda (you will probably also need to use smaller values for the sample rate spatial and the sample rate range).
What happens to the depth map generated by DMAG9b if you change the sample rate spatial from 32 to 16 (every other parameter set to default)? Let's find out!
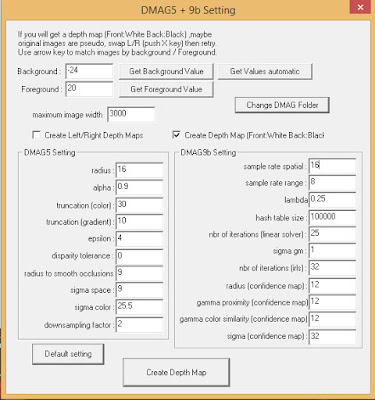
"Create depth map from stereo pair" window. Changed DMAG9b sample rate spatial from 32 to 16 (every other parameter set to default).

Depth map generated by DMAG9b (out.tif). Changed DMAG9b sample rate spatial from 32 to 16 (every other parameter set to default).
What happens to the depth map generated by DMAG9b if you change the sample rate range from 8 to 4 (every other parameter set to default)? Let's find out!
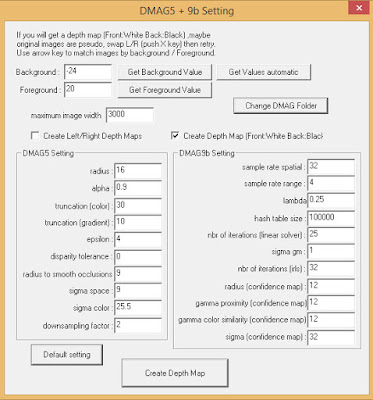
"Create depth map from stereo pair" window. Changed DMAG9b sample rate range from 8 to 4 (every other parameter set to default).

Depth map generated by DMAG9b (out.tif). Changed DMAG9b sample rate range from 8 to 4 (every other parameter set to default).
What happens to the depth map generated by DMAG9b if you change lambda from 0.25 to 0.5 (every other parameter set to default)? Let's find out!
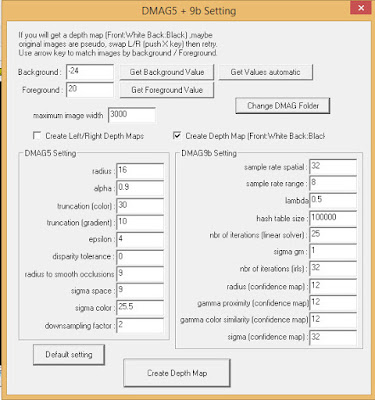
"Create depth map from stereo pair" window. Changed DMAG9b lambda from 0.25 to 0.5 (every other parameter set to default).

Depth map generated by DMAG9b (out.tif). Changed DMAG9b lambda from 0.25 to 0.5 (every other parameter set to default).
Video version of this post about generating depth maps in SPM:
Another shorter video:
Now, if you want to manually edit/fix the generated depth map, you can do so in SPM by clicking on "Edit->Depth map->Correct depth map". If you want to edit the generated depth map semi-automatically, you can use the techniques centered around DMAG11 or DMAG4 that are described in Case Study - How to get depth maps from old stereocards using ER9c, DMAG5, DMAG9b, and DMAG11 and Case Study - How to improve depth map quality with DMAG9b and DMAG4.
For the ultimate experience in editing depth maps semi-automatically, I recommend using 2d to 3d Image Conversion Software - the3dconverter2: load up the left image and the depth map (add an alpha channel if it does not have one), use the eraser tool to delete parts in the depth map you do not like (that becomes sparse_depthmap_rgba_image.png needed by the3dconverter), create a new layer and trace where you don't want the depths to bleed through (that becomes edge_rgba_image.png needed by the3dconverter), and run the3dconverter to get the new depth map called dense_depthmap_image.png. You do not to worry or care about gimp_paths.svg, ignored_gradient_rgba_image.png, and emphasized_gradient_rgba_image.png as they are not needed.
Video tutorial that explains how to use the3dconverter2 to edit depth maps:


