If you don't mind a little bit of tinkering to get sharper pictures under low light condition, it makes sense to me to choose a low ISO setting, say 100, and then play with the shutter speed and/or aperture to make the shot possible (or just see if the shot is possible with whatever the W3 chooses for speed and aperture in P shooting mode), upping the ISO setting to the next one in case the shot is not possible.
The Fuji W3 has 3 "manual" modes to choose from: A (you manually select the aperture), M (you manually select the aperture and shutter speed), and P (automatic aperture and speed selection). In each of those "not so automatic" modes, you can select an ISO setting as low as 100 ISO. If you don't want to do too much tinkering with shutter speeds and/or apertures, the P (PROGRAM) mode is the one to use in order to have direct access to lower ISO settings for the film sensitivity.
To see the effects of the ISO settings in low light condition, I took two 3D pictures (with flash and on a tripod) of my reel-to-reel tape deck from about 2 meters away using the P shooting mode of the Fuji W3, first with the ISO sensitivity setting at "AUTO (800)", second with the ISO sensitivity setting at "100". The MPOs were then loaded into SPM and I went 100% magnification of what my focus was on: the VU-meters. Again, the only difference between the 2 shots is the ISO setting, nothing else.

AUTO (800) ISO mode
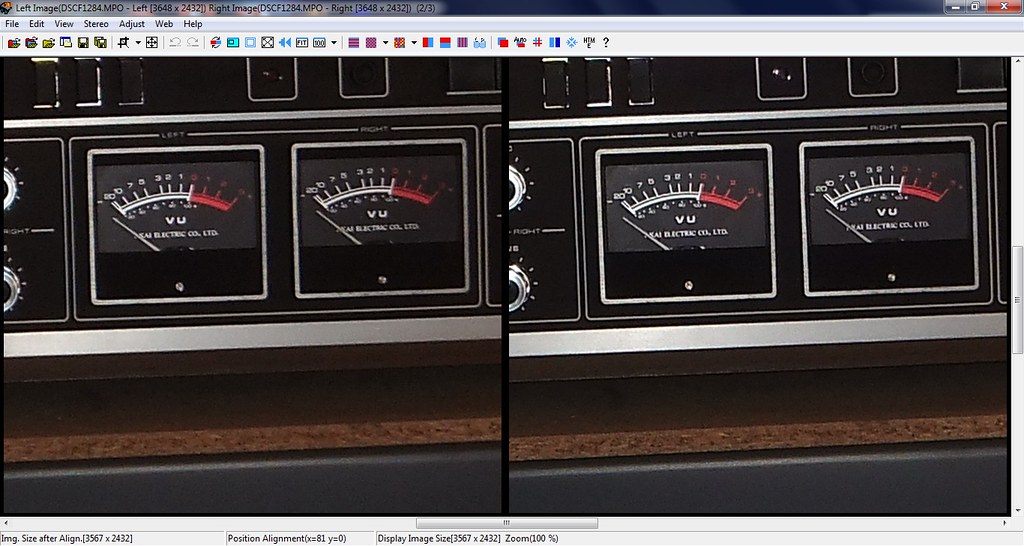
100 ISO mode
Night and day! For indoor shots, you clearly want to stay away from the default AUTO ISO modes (unless you don't mind mottling), especially knowing that you can get away with lowering the ISO setting all the way down to 100 without much of a problem, well, assuming you have enough light and a tripod at your disposal. Note that even at 100 ISO, the sharpness is really not that great for a 10 mega pixel camera but it is quite acceptable for a relatively cheap 3D camera (my little Pentax Optio S7 takes much sharper pictures but, to be fair, it doesn't house 2 CCDs).
When there's a lot of light available (outdoor shots), using the AUTO (800) ISO mode is not an issue since the Fuji W3 will probably select a setting of 100 ISO to take the picture (you can see the ISO setting a picture was taken in the lower left of the LCD screen along with other vital statistics like shutter speed and aperture).