
Left image after rectification by ER9b.

Right image after rectification by ER9b.
I took the stereo pair with an HTC Evo 3d cell phone which has a baseline of 35mm, I believe. The stereo pair is 1920x1080 pixels.
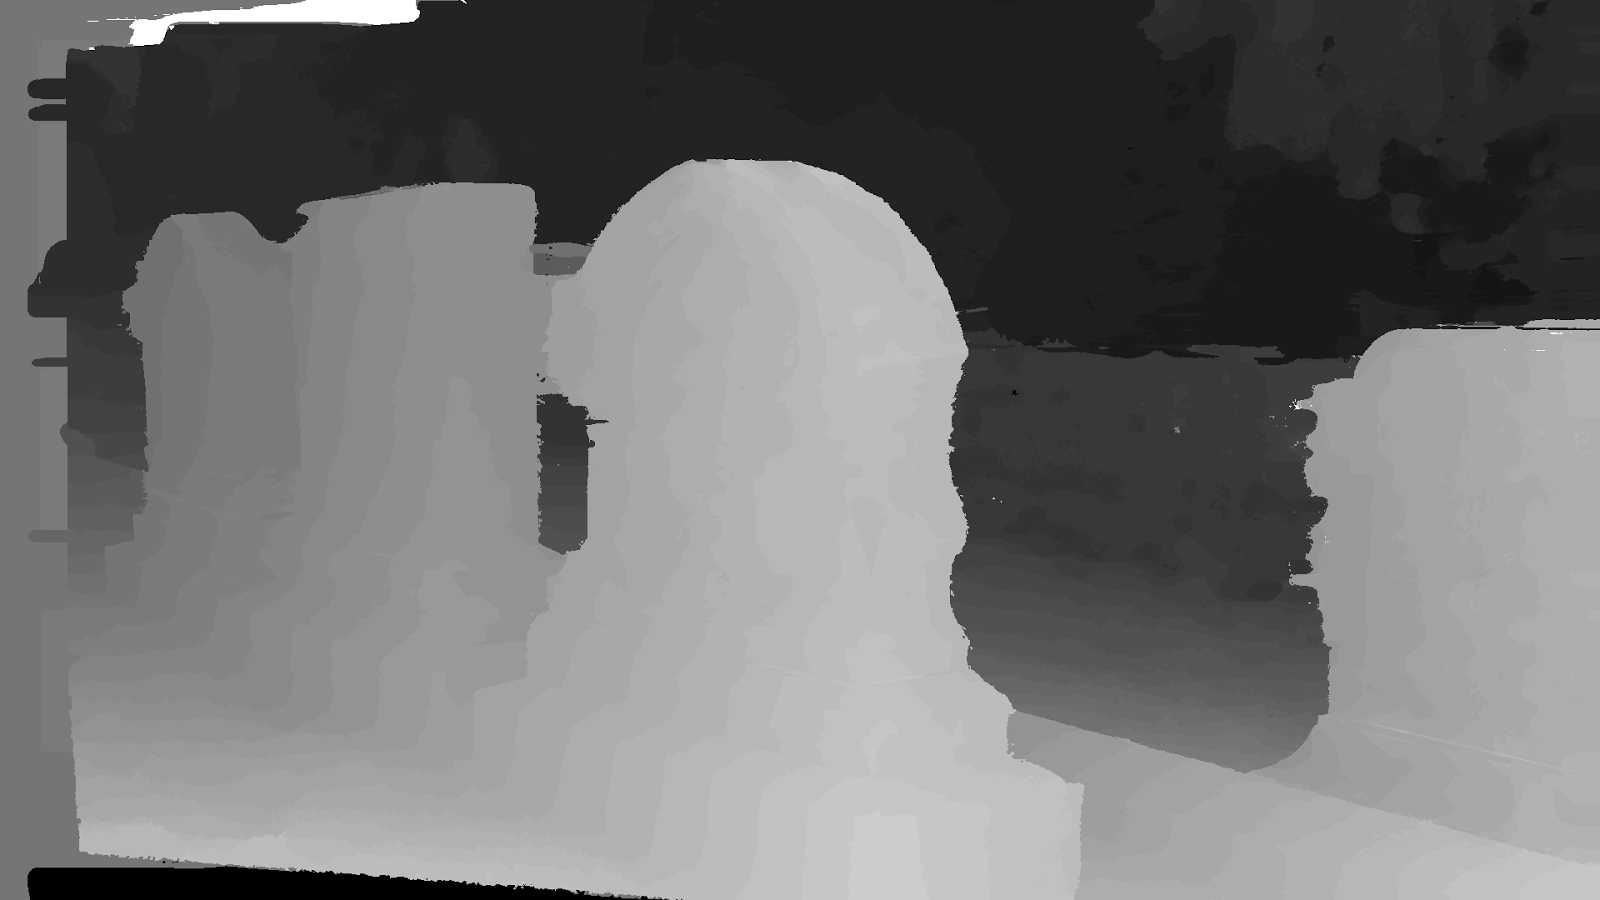
Left depth map obtained with DMAG5.
I used the following parameters for DMAG5:
min disparity for image 1 = -23
max disparity for image 1 = 27
disparity map for image 1 = depthmap_l.png
disparity map for image 2 = depthmap_r.png
occluded pixel map for image 1 = occmap_l.png
occluded pixel map for image 2 = occmap_r.png
radius = 16
alpha = 0.9
truncation (color) = 30
truncation (gradient) = 10
epsilon = 255^2*10^-4
disparity tolerance = 0
radius to smooth occlusions = 9
sigma_space = 9
sigma_color = 25.5
downsampling factor = 1
Since I am gonna use DMAG9b to smooth and sharpen the depth maps obtained by DMAG5b, it makes sense to also smooth and sharpen the depth map obtained by DMAG5 with DMAG9b.

Left depth map generated by DMAG5 and sharpened by DMAG9b.
I used the following parameters for DMAG9b:
sample_rate_spatial = 32
sample_rate_range = 8
lambda = 0.25
hash_table_size = 100000
nbr of iterations (linear solver) = 25
sigma_gm = 1
nbr of iterations (irls) = 32
radius (confidence map) = 12
gamma proximity (confidence map) = 12
gamma color similarity (confidence map) = 12
sigma (confidence map) = 32
Now that we have a point of reference, we can go ahead and see what happens when we use DMAG5b instead of DMAG5. As a reminder, DMAG5b is a very simplistic depth map generator that uses basic SAD (Sum of Absolute Differences) to find matches. This type of depth map generator always fatten object boundaries. The effect is more intense as the baseline increases and/or the radius increases.

Left depth map generated by DMAG5b.
I used the following parameters for DMAG5b:
min disparity for image 1 = -23
max disparity for image 1 = 27
disparity map for image 1 = depthmap_l.tiff
disparity map for image 2 = depthmap_r.tiff
occluded pixel map for image 1 = occmap_l.tiff
occluded pixel map for image 2 = occmap_r.tiff
radius = 16
alpha = 0.9
truncation (color) = 30
truncation (gradient) = 10
disparity tolerance = 0
radius to smooth occlusions = 9
sigma_space = 9
sigma_color = 25.5
The important parameter here is the radius. DMAG5b smoothes the disparities over a 2*radius+1 block window. To reduce the fattening of object boundaries, the only thing one can do is to reduce the radius but at the expense of increased noise.

Left depth map generated by DMAG5b.
I used the same parameters as before except:
radius = 8
I think it's tighter (than with radius = 16) so we are gonna use that depth map and sharpen it with DMAG9b.

Left depth map generated by DMAG5b and sharpened by DMAG9b.
I used the following parameters for DMAG9b:
sample_rate_spatial = 32
sample_rate_range = 8
lambda = 0.25
hash_table_size = 100000
nbr of iterations (linear solver) = 25
sigma_gm = 1
nbr of iterations (irls) = 32
radius (confidence map) = 12
gamma proximity (confidence map) = 12
gamma color similarity (confidence map) = 12
sigma (confidence map) = 32
Now, compare that depth map with the depth map we got with the combo DMAG5+DMAG9b and you will see that there's not a whole lot of difference between the two. So, I think it's fair to say that DMAG5b can safely be used in lieu DMAG5 as long as the obtained depth map is post-processed by DMAG9b.
Let's see what happens in the depth map produced by DMAG9b when we change the spatial sample rate and the range (color) sample rate.

Left depth map generated by DMAG5b and sharpened by DMAG9b.
I used the same parameters as before for DMAG9b except:
sample_rate_spatial = 32
sample_rate_range = 4

Left depth map generated by DMAG5b and sharpened by DMAG9b.
I used the same parameters as before for DMAG9b except:
sample_rate_spatial = 16
sample_rate_range = 8

Left depth map generated by DMAG5b and sharpened by DMAG9b.
I used the same parameters as before for DMAG9b except:
sample_rate_spatial = 16
sample_rate_range = 4
Now, it might be relatively fun to see what happens when we change the smoothing multiplier lambda. I am going back to sample_rate_spatial = 32 and sample_rate_range = 8 changing lambda only. We are gonna make the depth map less smooth first and then more smooth.

Left depth map generated by DMAG5b and sharpened by DMAG9b.
I used the following parameters for DMAG9b:
sample_rate_spatial = 32
sample_rate_range = 8
lambda = 0.025
hash_table_size = 100000
nbr of iterations (linear solver) = 25
sigma_gm = 1
nbr of iterations (irls) = 32
radius (confidence map) = 12
gamma proximity (confidence map) = 12
gamma color similarity (confidence map) = 12
sigma (confidence map) = 32

Same parameters as before except:
lambda = 2.5
Yeah, clearly, that's oversmoothed. We now know that lambda = 2.5 is way too aggressive and should be dialed back.