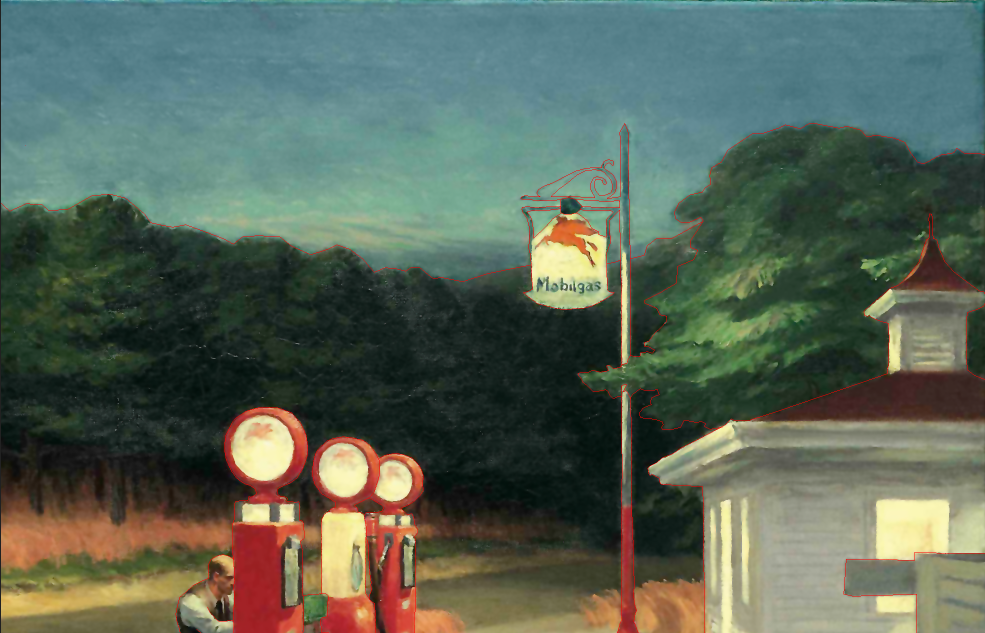
Thursday, June 4, 2020

Winslow Homer's "The Adirondack Guide" - 2d to 3d image conversion using the3dconverter2

This post presents a 2d to 3d image conversion of Winslow Homer's "The Adirondack Guide". I undertook this tedious process mostly in order to make a video tutorial showing the whole process from beginning to end. As you can see/hear in the video, it's not that easy to make 2d to 3d conversions.


Reference image.


Dense depth map generated by the3dconverter2.

It took me about 2 hours of trial and error and I must say that I was completely drained when I decided it was time to quit and call it a day. This depth map has obvious errors which I am just discovering now. I completely forgot about the hole around where the left oar holder is. Also, I put the hole between the left arm and leg of the guide at the wrong depth. Last but not least, I completely ignored the depth discontinuity on the right side of the boat leaving a gigantic hole, which would prevent any boat from floating, I think. Those are easy fixes though.

The so-called Gimp paths are used to provide dynamic depth clues to the3dconverter2, as opposed to the static depth clues given in the sparse depth. I call the clues given in the Gimp paths dynamic because they can be easily changed either by modifying the path itself or by changing the path's name and hence its associated depth clue. Now, what does the3dconverter2 does with those Gimp paths? For the3dconverter2, any pixel along the path is assigned the depth given to the path itself (via its name). For any pixel with unknown depth (not along a Gimp path or not drawn in the sparse depth map), the3dconverter2 will give the best possible depth value by propagating the depth of pixels which are at known depths.

3d wiggle/wobble made with wigglemaker.

Video showing the whole process:


Follow me on youtube if you want more in-depth videos since those are a bit painful to make.

UPDATE!

After a lot of rest, I made a few changes to my Gimp paths here and there, especially for the boat. It really didn't take long, maybe 10 minutes, until I was satisfied. What really helped is to order the paths (in the path dialog window) w/r to depth.


New dense depth map produced by the3dconverter2.


New wobble/wiggle 3d animated gif.

Video showing the fixes:


Follow me on youtube if you want more in-depth videos since those are a bit painful to make.

Thursday, May 14, 2020

Fun fact: the3dconverter2 can be used to edit depth maps

It is possible to use the3dconverter2 to edit depth maps relatively easily.

Here is the process:

1) Load (in Gimp) the reference image, typically, the left image of a stereo pair.

2) Load (as a layer) the depth map that needs to be edited.

3) Erase the input depth map in places where the depths do not appear to be correct.

4) If, for at least one area that's been erased, there is a depth discontinuity in the reference image, create a new layer and draw along the discontinuities using the pencil tool (size = 1 pixel). What you are doing is drawing a so-called "edge image".

4) Export the reference image as "content_image.png".

5) Export the partially erased input depth map as "sparse_depthmap_rgba_image.png".

6) Export the edge image as "edge_rgba_image.png". If there was no need to draw an edge image, then do nothing in this step.

7) Run the3dconverter2.

Here is an example:


Reference image aka "content_image.png".


Input depth map that needs to be edited.


Partially erased depth map aka "sparse_depthmap_rgba_image.png". Pure white pixels are actually transparent.

Note that I could have done a much better job erasing stuff on the right side (upper right, to be precise) as I clearly missed a few pixels. No big deal but it's gonna show up in the output depth map. If you are a perfectionist, you should really erase them.


Edge image aka "edge_rgba_image.png".

Here, I simply draw along what looks like a paddle since the paddle is clearly not at the same depth as the background. That's what I mean by depth discontinuity. You only need to draw within the confines of what's been erased in the input depth map, nothing more.


Output from the3dconverter2.

Remember those dark pixels I didn't erase on the right side (upper right) of the input depth map... I told you they would show up.

Here is a video tutorial that shows how the3dconverter2 can be used to edit depths maps:


Here is another video tutorial about the3dconverter2 but more in the context of 2d to 3d image conversion:

Tuesday, February 25, 2020

Edward Hopper's Gas oil painting converted to 3d with the3dconverter2


This is the reference image.

Actually, this image is 600 pixels wide but the one I actually worked with is 2960 pixels wide.

This is of course the painting called "Gas" created by Edward Hopper in 1940.

I am going to use Gimp and 2d to 3d Image Conversion Software - the3dconverter2 to create a dense depth map for that reference image. Feel free to download the Gimp file I created un order perhaps to have a better idea of what I did: edward_hopper_gas.xcf.

The first thing I do is create a so-called "edge image". This will guarantee that the depths will not bleed across objects at different depths. I simply trace over the reference image with the pencil tool using a new layer. I use the pencil tool using the smallest possible brush. The pencil tool needs to be used because it produces aliased lines unlike the brush tool that produces anti-aliased lines. I keep "shift" pressed to draw straight line segments.


Edge image on top of the reference image. Zoomed so that one can see the red line segments of the edge image.

The edge image only contains the red line segments. I am showing the reference image underneath to make it clearer what the edge image contains.

For this type of reference image, it makes sense to use a sparse depth map where the depths on the ground can be easily set with a gradient. I use the free select tool and then the gradient tool on a new layer. Anything that's not the ground needs to be erased with the eraser tool (using Hard Edge option). Once you are done with the sparse depth map, click on "Layer->Transparency->Threshold Alpha..." (click OK) to get rid of semi-transparent pixels. Those come from the gradient tool or any other tool that anti-aliases. Note that you don't absolutely need a sparse depth map, but in this particular case, it would be a mistake not to have one because there is nothing easier than setting depths when you can see the ground. And those depths are gonna help us when we need to create the paths.


Sparse depth map on top of the reference image.

The sparse depth map only contains the grayscale gradient. I am showing the reference image underneath to make it clearer what the sparse depth map contains.

The3dconverter2 needs depth clues (when not given in the sparse depth map) from paths. All is needed is figure out paths where the depth is constant and name the path with the depth. So, for example, if you draw a path and the depth along that path is 128, the path is given the name "128". If there is already a path with that name, gimp is going to add a "#1" to the name, which is totally fine. The3dconverter2 only looks at the first three digits to figure out at what depth the path is. The beauty of using paths is that, if you make a mistake for the depth, that can be easily changed.

Drawing a path is fairly easy. All you have to do is click on the Paths tool and left-click. I recommend clicking on "Polygonal" in the tool options so that the path segments are always straight, which is what we want. So, left-click to add an anchor and left-click + shift to start a new path component. To close a path component, left-click + control.


Gimp paths. The window on the right shows all the created paths.

For this 3d conversion, I created about 30 paths. If you look at the "Paths" window on the right, the name of any given path represents its depth. For each path, all the pixels that make up the path are going to be at that depth in the dense depth map produced by the3dconverter2.

It's time to do some exporting. I export the layer containing the edge image as "edge_rgba_image.png", the layer containing the sparse depth map as "sparse_depthmap_rgba_image.png", and the paths as "gimp_paths.svg".

It's time to run the3dconverter2 and get the dense depth map.


Dense depth map produced by the3dconverter2.

I use depthplayer to get an idea of what the 3d scene actually looks like. Let-click with you mouse to make the 3d scene rotate. Use the wheel to zoom. I like to switch to "Point Cloud" as "Render Mode".

I think Facebook 3D is the best place to share those 3d conversions, but you can also use wigglemaker to create a wobbly animated gif.


Wiggle/wobble created by wigglemaker.

I made a video on youtube that explains the whole process from start to finish, kinda:


If you like the video, please subscribe to my channel. I am begging you.

For more info on the3dconverter2 (including download link), check 2d to 3d Image Conversion Software - the3dconverter2.

Thursday, February 6, 2020

An example of 2d to 3d conversion via depth map using the3dconverter2


This is the 2d image for which we want to create a depth map.

Step 1: Create a so-called "edge image" in Gimp.

All you have to do is create a new transparent layer and trace around the objects/persons in the reference image using the pencil tool with a 1 pixel brush (smallest possible). Keeping the "shift" key pressed (will create straight line segments), left-click the mouse button and trace arounbd the objects/persons. If there is a depth discontinuity in the reference image, there should be line segments along the depth discontinuity. Use whatever color you want! I prefer using red. Once you are done, export the layer as "edge_rgba_image.png" and you are done with the "edge image".

Step 2: Create paths to indicate depth clues.

Try to visualize planes parallel to the screen where the depth is constant. For each depth, create a path and name the path "XXX" where XXX is between 000 (furthest or black in the dense depth map) and 255 (closest or white in the dense depth map). If you name the path "XXX" and Gimp changes the name to "XXX #Y" where Y is 1, 2, 3, etc, that's totally fine.

A few tips about the creation of paths:

- Click on the "Polygonal" radio button in the "Tools Options" window so that you only create straight segments.
- Press "Shift" to force the creation of a new path component.
- Press "Ctrl" to enable the closing a path component. You still have to hover over the starting node and left-0click to actually close the path component.
- Press "Ctrl" + Z to remove the last created segment/node.

Once you are done with your paths, right-click on one path and press "Export Path". Make sure to choose "Export all paths from this image" and save as "gimp_paths.svg".

Step 3: Run the3dconverter2 to get the dense depth map.

Use the following input file:

content_image.png
sparse_depthmap_rgba_image.png
dense_depthmap_image.png
gimp_paths.svg
diffusion_direction_rgba_image.png
edge_rgba_image.png

"content_image.png" is your referenc image i.e. the 2d image.
"dense_depthmap_image.png" is the dense depth map to be created by the3dconverter2.
"gimp_paths.svg" contains the paths.
"edge_rgba_image.png" contains the "edge image".

Pay absolutely no attention to:
sparse_depthmap_rgba_image.png
diffusion_direction_rgba_image.png
as you don't need them one bit.

Step 4: Use depthplayer to check if your dense depth map is good enough.

If it is not, adjust the paths and rerun the3dconverter2 until you are satisfied.

For you convenience, I have uploaded the whole Gimp project onto Google Drive so that you can see what the "edge image" and the paths look like: altered_carbon.xcf.


Screen grab of my Gimp project showing the paths I created.


Dense depth map generated by the3dconverter2.

If you rename the dense depth image "content_image_depth.png", you can post it on Facebook as a "Facebook 3D" photo. Pretty cool! By the way, does anybody know how to embed a Facebook 3D photo post onto blogger. I tried the "Embed Post" from Facebook but it doesn't work. Sniff!

Download link for the3dconverter2 (windows 64 bit): the3dconverter2-x64.rar. More info about the3dconverter2: 2d to 3d Image Conversion Software - the3dconverter2. Feel free to visit 3D Software for more free automatic depth map generation software.

Now, I must admit you need to be quite proficient in Gimp to properly use the3dconverter2, in particular, you need to know how to create layers, how to use the Pencil tool, and how to use the Paths tool.