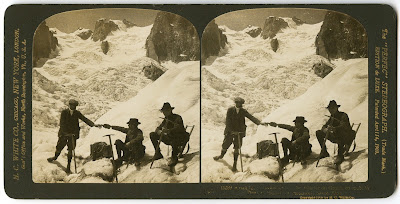
This is an 1908 stereo card by H.C. White: A halt for refreshments on the Glacier du Géant, en route to Dent du Requin (in distance), Savoy, Alps.
First thing that needs to be done is to rectify the images, so that matches are always along the horizontal. We are gonna use ER9b to rectify the stereo pair.
Output from er9b (the important part):
Mean vertical disparity error = 0.384476
Min disp = -35 Max disp = 0
Min disp = -37 Max disp = 3
Here, we learn that the max vertical disparity error is rather small, which is very good. Ideally, it should be 0.0 (perfectly rectified images) but anything under 0.5 is excellent. As a bonus, we also get the min and max disparities: -37 and 3.
At this point, we kinda need to choose which depth map automatic generator to use. I tend to recommend using either DMAG5 or DMAG5b followed by DMAG9b. Let's try both combos!
List of all parameters used in DMAG5 (corresponding to depth map above):
radius = 16
alpha = 0.9
truncation (color) = 30
truncation (gradient) = 10
epsilon = 255^2*10^-4
disparity tolerance = 0
radius to smooth occlusions = 9
sigma_space = 9
sigma_color = 25.5
downsampling factor = 1
List of all parameters used in DMAG5 (corresponding to depth map above):
radius = 8
alpha = 0.9
truncation (color) = 30
truncation (gradient) = 10
epsilon = 255^2*10^-4
disparity tolerance = 0
radius to smooth occlusions = 9
sigma_space = 9
sigma_color = 25.5
downsampling factor = 1
List of all parameters used in DMAG5b (corresponding to depth map above):
radius = 16
alpha = 0.9
truncation (color) = 30
truncation (gradient) = 10
disparity tolerance = 0
radius to smooth occlusions = 9
sigma_space = 9
sigma_color = 25.5
List of all parameters used in DMAG5b (corresponding to depth map above):
radius = 16
alpha = 0.9
truncation (color) = 30
truncation (gradient) = 10
disparity tolerance = 0
radius to smooth occlusions = 9
sigma_space = 9
sigma_color = 25.5
Let's apply DMAG9b to all 4 depth maps and see what we get. We are gonna use the same DMAG9b parameters for all 4 depth maps.
List of all parameters used in DMAG9b (for all depth maps):
sample_rate_spatial = 32
sample_rate_range = 8
lambda = 0.25
hash_table_size = 100000
nbr of iterations (linear solver) = 25
sigma_gm = 1
nbr of iterations (irls) = 32
radius (confidence map) = 12
gamma proximity (confidence map) = 12
gamma color similarity (confidence map) = 12
sigma (confidence map) = 32
Not a whole lot of difference between all the depth maps after post-processing by DMAG9b. I am very tempted to say that it doesn't matter much whether you use DMAG5 or DMAG5b (or any of the other DMAG generators) to get the initial depth map (prior to applying DMAG9b). I tend to use the simplest depth map generator, that is, DMAG5b, to get the initial depth map. Note that one could play around with the DMAG9b parameters to attempt to improve the depth map quality, in particular, sample_rate_spatial (use 16 instead of 32 for example), sample_rate_range (use 16 or 4 instead of 8 for example), and lambda (use 2.5 or 0.025 instead of 0.25 for example).


