Tuesday, March 14, 2017

Frame Sequence Generator 11 (FSG11)

FSG11 generates synthetic views given an input image and a depth map. It's kinda like Frame Sequence Generator 4 (FSG4). Unlike DMAG4 where you can select where the plane of zero parallax is (aka the stereo window), DMAG11 always uses a stereo window at 0 (pure black in the grayscale depth map), meaning that everything is in front of the stereo window.


Input image.


Depth map.

Input file (fsg11_input.txt):
reference_rgb_image.png
dense_depthmap_image.png
6
3
4
32.

Here, I am requesting:
stereo effect = 6
number of frames = 3
radius = 4
gamma_p = 32.

For more info about those parameters mean, check fsg11_manual.pdf in your installation directory.

Of course, in real life, you would probably ask for more frames, maybe 12.

Here's the output from FSG11:


frame01.png.


frame02.png. Same as input image.


frame03.png.


Animated gif that combines the frames produced by FSG11.

As you can see, the inpainting areas are nicely blurred with only elements from the background. FSG11 works best when the depth map is aliased, as opposed to anti-aliased.


Depth map (zoomed).

This is what the depth map should look like when zoomed in. What you want to see is an aliased depth map where there is absolutely no transitioning between the various shades of gray. If the depth map is anti-aliased, the inpainted areas are likely to look not well blurred and that can be distracting.

The windows executable (guaranteed to be virus free) is available for free via the 3D Software Page.

Friday, March 10, 2017

Lenticular Creation From Stereo Pairs Using Free Software

I have written a technical report which explains how to create a lenticular (assuming you have you already have the lenticular lenses at your disposal) when the starting point is either a stereo pair taken by a stereo camera, a couple of images of a static scene taken with a regular camera (using the very cool cha-cha method, for exanple), or an image and a depth map (perhaps resulting from a 2d to 3d image conversion).

Here's the link: Lenticular Creation From Stereo Pairs Using Free Software.

Bonus gif that goes with the paper:


Animated gif consisting of 10 frames produced by FSG4.

Sunday, March 5, 2017

3D Photos - Posing in front of the big column

The original stereo pair was 3603x2736 pixels (provided by my good friend Mike). I chose to reduce it by 50% (for convenience) to end up with a stereo pair of size 1802x1368 pixels. First step is to rectify the images in order to end up with matching pixels on horizontal lines, a requirement for most automatic depth map generators. Here, I am using ER9b but it's probably ok to rectify/align with StereoPhoto Maker.


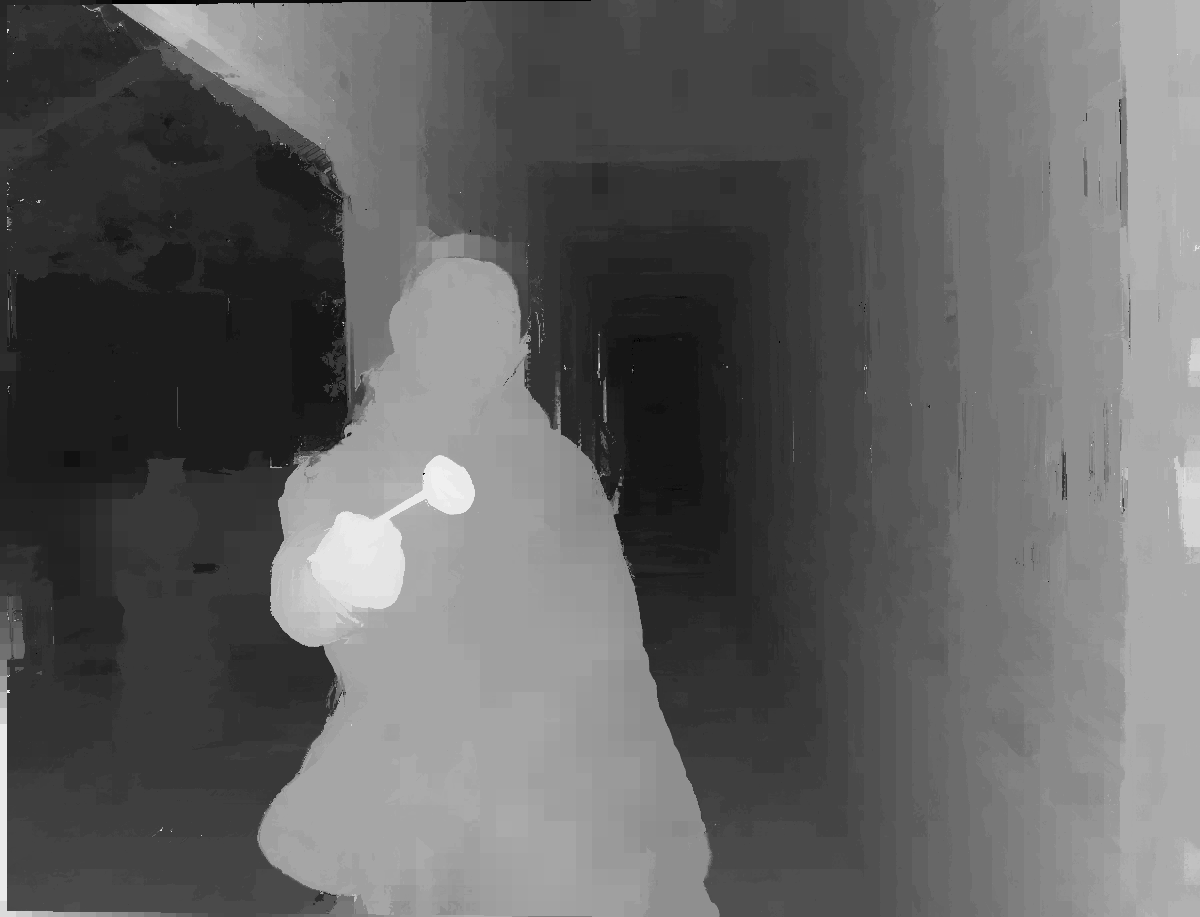
Left image of stereo pair rectified by ER9b.


Right image of stereo pair rectified by ER9b.

ER9b gives:
min disparity = -53
max disparity = 1

We are gonna use those as input to the automatic depth map generator. The min and max disparities may also be obtained manually with DF2.

We are gonna use DMAG5 (first using a large radius and then using a small radius) followed by DMAG9b to get the depth map. I could have used other automatic depth map generators but I kinda like DMAG5 because it's fast and usually pretty good.

Let's start by using a large radius (equal to 32). Parameters used in DMAG5 (Note that I use a downsampling factor equal to 2 instead of 1 to speed things up.):

radius = 32
alpha = 0.9
truncation (color) = 30
truncation (gradient) = 10
epsilon = 255^2*10^-4
disparity tolerance = 0
radius to smooth occlusions = 9
sigma_space = 9
sigma_color = 25.5
downsampling factor = 2


Left depth map generated by DMAG5.

Let's follow up with DMAG9b to improve the depth map. Parameters used in DMAG9b:

sample_rate_spatial = 16
sample_rate_range = 8
lambda = 0.25
hash_table_size = 100000
nbr of iterations (linear solver) = 25
sigma_gm = 1
nbr of iterations (irls) = 32
radius (confidence map) = 12
gamma proximity (confidence map) = 12
gamma color similarity (confidence map) = 12
sigma (confidence map) = 4


Left depth map generated by DMAG9b.

It's time now to use a small radius in DMAG5 (equal to 4). Parameters used in DMAG5:

radius = 4
alpha = 0.9
truncation (color) = 30
truncation (gradient) = 10
epsilon = 255^2*10^-4
disparity tolerance = 0
radius to smooth occlusions = 9
sigma_space = 9
sigma_color = 25.5
downsampling factor = 2


Left depth map generated by DMAG5.

Let's follow up with DMAG9b to improve the depth map. Parameters used in DMAG9b (same as before):

sample_rate_spatial = 16
sample_rate_range = 8
lambda = 0.25
hash_table_size = 100000
nbr of iterations (linear solver) = 25
sigma_gm = 1
nbr of iterations (irls) = 32
radius (confidence map) = 12
gamma proximity (confidence map) = 12
gamma color similarity (confidence map) = 12
sigma (confidence map) = 4


Left depth map generated by DMAG9b.

I am gonna go with the depth map obtained using the small radius. Is it the best depth map that could be obtained automatically? Probably not because one could have tweaked further the parameters used in DMAG5 and DMAG9b. Also, one could have tried using DMAG2, DMAG3, DMAG5b, DMAG5c, DMAG6, or DMAG7 instead of DMAG5 to get the initial depth map. That's a whole lot of variables to worry about. Anyways, now is time to generate synthetic frames with FSG4 using the left image and the left depth map (and going on either side).

Parameters used for FSG4:

stereo window (grayscale value) = 128
stereo effect = 5
number of frames = 12
radius = 2
gamma proximity = 12
maximum number iterations = 200


Synthetic frames generated by FSG4 (in animated gif form).

Inpainting is typically done by applying a Gaussian blur, which explains why inpainted areas look blurry. FSG6 produces synthetic frames of better quality because the right image and depth map are also used to inpaint. However, with FSG6, the synthetic frames are limited to be between the left and right images.

Now, if the object of the game was to create a lenticular, those synthetic views would be now fed to either SuperFlip or LIC (Lenticular Image Creator) to create an interlaced image. The fun would not stop here however as this interlaced image would have to be printed on paper and then glued to a lenticular lens. Yes, it is indeed a whole lot of work!

3D Photos - Summer Palace

In this post, we are gonna try to get the best possible depth map for a stereo pair provided by my good friend Gordon. Size of the images is 1200x917 pixels, so about 1 mega pixels.


Left image (after rectification by ER9b).


Right image (after rectification by ER9b).

ER9b gives us:
min disparity = -82
max disparity = 7

Let's turn to our favorite automatic depth map generator, DMAG5, to get the depth map. Here, we are gonna use a downsampling factor of 2 to speed things up.

Let's start with the following parameters for DMAG5:

radius = 16
alpha = 0.9
truncation (color) = 30
truncation (gradient) = 10
epsilon = 255^2*10^-4
disparity tolerance = 0
radius to smooth occlusions = 9
sigma_space = 9
sigma_color = 25.5
downsampling factor = 2


Left depth map generated by DMAG5.


Left occlusion map generated by DMAG5.

Not a very good depth map! Unfortunately, we have occluded pixels on the right of Gordon and at the top of its head. The occluded pixels on the left are totally expected.

Let's call on DMAG9b to shake things up and improve the depth map.

Parameters we are gonna use in DMAG9b:

sample_rate_spatial = 16
sample_rate_range = 8
lambda = 0.25
hash_table_size = 100000
nbr of iterations (linear solver) = 25
sigma_gm = 1
nbr of iterations (irls) = 32
radius (confidence map) = 12
gamma proximity (confidence map) = 12
gamma color similarity (confidence map) = 12
sigma (confidence map) = 4


Left depth map generated by DMAG9b.


Confidence map generated and used by DMAG9b. Black is low confidence and white is high confidence.

Better but it looks likes it is gonna be a tough one. Let's try something else by reducing the radius used in DMAG5 and post-process again with DMAG9b.

Let's use the following parameters for DMAG5:

radius = 4
alpha = 0.9
truncation (color) = 30
truncation (gradient) = 10
epsilon = 255^2*10^-4
disparity tolerance = 0
radius to smooth occlusions = 9
sigma_space = 9
sigma_color = 25.5
downsampling factor = 2


Left depth map generated by DMAG5.


Left occlusion map.

Clearly, there is a lot more noise but we are hoping the less smoothed and more accurate depths will give better results in DMAG9b.

Parameters we are gonna use in DMAG9b (same as before):

sample_rate_spatial = 16
sample_rate_range = 8
lambda = 0.25
hash_table_size = 100000
nbr of iterations (linear solver) = 25
sigma_gm = 1
nbr of iterations (irls) = 32
radius (confidence map) = 12
gamma proximity (confidence map) = 12
gamma color similarity (confidence map) = 12
sigma (confidence map) = 4


Depth map generated by DMAG9b.


Confidence map used and generated by DMAG9b.

I think it might be possible to improve the depth map further either by tweaking further the parameters used in DMAG5 or by using another automatic depth map generator like DMAG2, DMAG3, DMAG5b, DMAG5c, or DMAG6.