DMAG6 is similar to Depth Map Automatic Generator 3 (DMAG3). Indeed, DMAG3 is also a "global method" stereo matcher but instead of using belief propagation to minimize the cost function, it uses graph cuts.
The disparity map is obtained for both the left image and the right image. This provides a way to figure out the occlusions (and pixels where the depth cannot be evaluated accurately) which are shown in the occlusion map.
Let's go over the parameters that control DMAG6's behavior:
- Minimum disparity is the disparity corresponding to the furthest point in the background.
- Maximum disparity is the disparity corresponding to the closest point in the foreground.
I suggest using Disparity Finder 2 (DF2) to get the minimum and maximum disparity. Better yet, you can use Epipolar Rectification 9b (ER9b) to rectify/align the two images (crucial for good quality depth map generation) and get the min and max disparities automatically.
- Alpha is the term that balances the color matching cost and the gradient matching cost. The closer alpha is to 0, the more importance is given to the color. The closer alpha is to 1, the more importance is given to the gradient. In theory, a higher alpha works better when there's quite a bit of texture in the image while a lower alpha works better when the image is relatively flat color wise.
- Truncation value (color) limits the value the color matching cost can take. It reduces the effects of occluded pixels (pixels that appear in only one image).
- Truncation value (gradient) limits the value the gradient matching cost can take. It reduces the effects of occluded pixels (pixels that appear in only one image).
- Truncation value (discontinuity) reduces the penalty when neighboring disparities are different. In the interior of an object, you want the disparities to be pretty much the same assuming the object is in the same depth plane, therefore you want to penalize disparity changes quite a bit. At the boundary of an object where depths can change abruptly, you don't want to penalize the disparity change too much.
I tend to set the truncation value (color) to 20.0 or 30.0, the truncation value (gradient) to 2.0, and the truncation value (discontinuity) to something very large, like 10000.0. Feel free to experiment though!
- Iteration number controls the number of belief propagation iterations at each level.
- Level number controls how many levels the coarse to fine pyramid has. Multi-scale belief propagation means that belief propagation is performed at different levels of the coarse to fine pyramid. The pyramid is built by recursively downsampling the original images.
- Disparity tolerance (occlusion detection). The larger the value, the more mismatch is allowed (between left and right depth maps) before declaring that the disparity computed at a pixel is wrong. Obviously, the larger the value, the less black the occlusion map will look.
- Window radius (occlusion smoothing).
- Sigma space (occlusion smoothing).
- Sigma color (occlusion smoothing).
The parameters that relate to occlusion detection and smoothing should probably be left alone since they only have an effect on the "occluded" pixels, that is, the pixels that show up in black in the occlusion maps.
- Downsampling factor. This parameter enables DMAG6 to run faster by downsampling the images prior to computing the depth maps. If set to 1, the images are used as is and there's no speedup. If set to 2, the images are resized by reducing each dimension by a factor of 2 and DMAG6 should go 4 times faster. The more downsampling is requested, the faster DMAG6 will go, but the more pixelated the depth maps will look upon completion. Downsampling is a quick way to test what parameters do. If downsampling is turned on, the parameters that are spatial, that is, min and max disparity, window radius, window radius (occlusion smoothing), and sigma space (occlusion smoothing) are automatically adjusted to adapt to the level of downsampling that is requested. In other words, you don't have to wonder if you should change those parameters when switching, for example, from downsampling factor = 1 to downsampling factor = 2 as DMAG6 does it automatically for you.
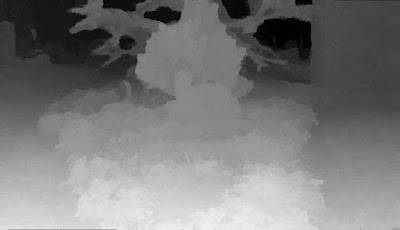
Here's an example:

Left depth map obtained with DMAG6 using alpha = 0.9, truncation value (color) = 20., truncation value (gradient) = 10., truncation value (discontinuity) = 10000., iteration number = 5, level number = 5, and lambda = 0.5.
More examples (that compare DMAG6 with DMAG5):
3D Photos - Stevenson tombstone
3D Photos - Civil War reenactors
3D Photos - Looking down at the tombstones
The windows executable (guaranteed to be virus free) is available for free via the 3D Software Page. Please, refer to the 'Help->About' page in the actual program for how to use it.


No comments:
Post a Comment